How To Change Font Style & Size In WordPress
Do you want to customize the font on all of your WordPress posts on your website?
You can do that very easily using the methods outlined in this article. For example, you can use the TinyMCE Advanced plugin or any other plugin you like to easily change specific portions of your WordPress messages or posts.
But what if you want to customize the font of a particular text in a WordPress message?
Below is an explanation of how to do that and more. You will need to know how to change the font style and size of your WordPress posts because this is an essential thing that all WordPress users must know.
Optimizing the content of your WordPress posts for the web and readability is important. So to improve readability and general SEO-friendliness, you have got to ensure that the text on your WordPress posts is easy to read.
Fortunately, changing the Font size in WordPress is easy, whether it is on the page or post content. There are various possible ways to modify the font size.
In this handy guide, you get to learn different ways to change font size and even a guide on the proper way to choose a font size that will suit the overall look of your website. So, you should read through everything in this article to get a good grasp on what to do so that you can change the font style and sizing of your WordPress posts.
Methods To Change Font Style & Size In WordPress
Let’s explore different methods to change font style and size in WordPress:
Try Using Paragraph Headings
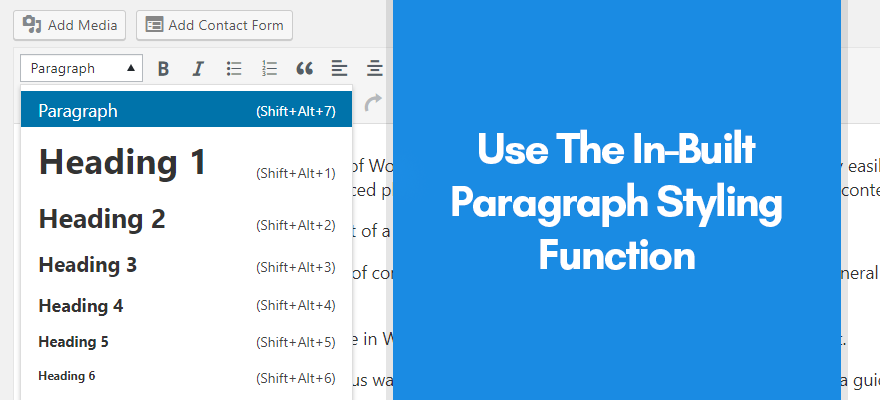
WordPress’s first method of changing the font size is using its paragraph headings. This is probably the easiest way for you to try and modify the font settings on your Wordpress website. Unsurprisingly, most website owners want a larger font size to grab the readers’ attention, particularly the heading elements.
When you write a post content, you can find an option where you can choose different sizes for the title. At the editor mode, you get to see various items under the paragraph tab. You will find multiple formats on headings, including the size.
The sizes are controlled according to the theme’s stylesheet settings, which can be found inside the style.css file. This file ensures that the font size is logical with all the other elements on the page. Using the heading styles already formatted and ready to use is a good option because you can emphasize the SEO aspects of your website, and one of them is using the heading tags. This highlights the main keywords that are included in the headings.
Use Available Plugins
There are also plugins that you can use to change your website’s WordPress font settings. This is a slightly more advanced option. So, you may want to be more familiar with how to use WordPress before you start using these plugin features to try to change the font of your website.
You can also consider using premium WordPress magazine themes because almost all come with advanced typography control features. With the help of the theme customizer or setting panel, you can browse through 100’s of professionally designed fonts on Google web font directory. Furthermore, you even get full control over the styling of the typography. This means that you can change the colors, transformations, and size of the font installed on your site directly from the control panel.
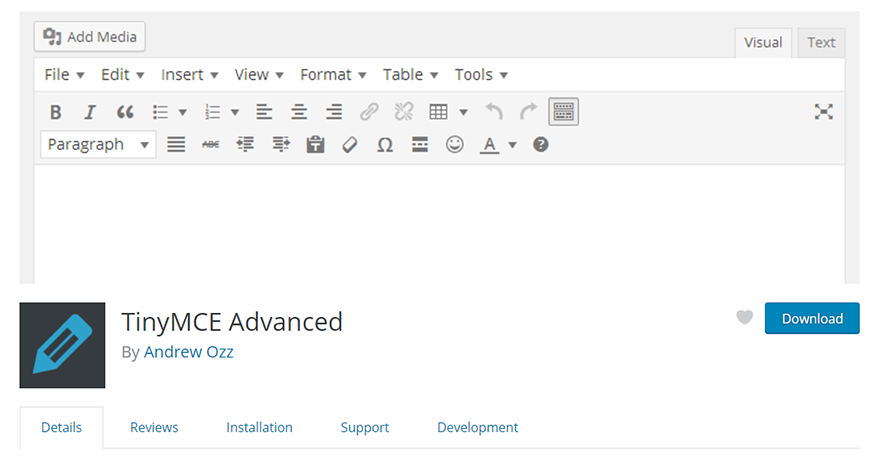
The only plugin I will suggest you install is TinyMCE advanced. After activating the plugin, simply head directly to the Settings tab and click on TinyMCE Advanced. In here, you customize the editor settings. There are various buttons you will find here and even some unused ones below.
What you need to do here is just click, hold to drag, and then drop the button to change font sizes into any row at the toolbar above. This is where the font size will be positioned when you use the visual editor to make a new page or post. After you have correctly positioned the toolbar, click on the Save Changes button. If you want to see the plugin in action, just edit an existing post or create a new one.
You will find that the default visual editor of WordPress has already been replaced with the editor from TinyMCE Advanced, together with the font-sizes button. From the Font-size button, you get to see various sizes from its drop-down menu.
Unlike the default option with WordPress, you can choose font sizes that are even smaller than the regular sizes 8pt and 10pt. The disadvantage of this plugin is that whenever you change themes, you need to consider the change with all the font sizes in every post you have made.
TinyMCE Advanced is not recommended if you modify the font size of all the paragraphs, like an entire post in content. Instead, you must modify the formatting directly in the stylesheet or the style.css file. Otherwise, the TinyMCE plugin Advanced is a great option if you need another method for changing the font style and size of the text on your WordPress web pages.
This is one of the most convenient options that you have for changing the font on your WordPress website.
Using CSS to Edit WordPress Post & Font
In the past, websites were built using plain HyperText Markup Language, which can be shortened to the acronym HTML. With this, people built a static site, and you could not easily adapt to the HTML codes you used. Nowadays, you have a dynamic website with a Content Management System like WordPress. Almost all CMSs have a database where all text, data, and passwords are stored and retrieved as needed. The basis of this system is the combination of PHP programming language with HTML.
That’s a simple explanation, but for now, it’s enough. Within the CSS and HTML page of your WordPress post, you can find the class section. This is a class that you can reuse. You can link this class to different items on your page so you can easily customize a font size or text color for your entire website. So editing allows you to change the font style of your WordPress post, even the size.
The default HTML code may also be edited so that you can change the different font and formatting settings for the paragraphs and headings. This would be one easy way for you to modify the font style of both the article sections and headings of your WordPress posts. However, you will have to dig deep into the CSS and HTML code to find these settings and options so that you can edit them.
Changing Default Font of WordPress Website
This option changes the font that is automatically used for all text on your site. So it may be a way for you to modify the font of your WordPress website pretty quickly.
You may want to set the default font of your WordPress site before you even post any new content onto it. This can be done by customizing your site’s stylesheet (style.css). This file indicates which formatting is used for different elements on your site. To open your stylesheet, click ‘Appearance,’ then ‘Editor.’ These are the font-changing options that you can find on the left-hand side of your WordPress editor suite.
Search the style sheet to the body until you locate the HTML text for the default font to be used on your WordPress website. Before making any changes, you must create a backup copy of this stylesheet.
This is because you can quickly reset everything back to the default and fix any errors if you have a backup copy of this stylesheet. Creating a backup copy of this text is easy. All you have to do is select all text in your stylesheet and copy it, for example, to a .txt file on your computer.
A visitor to your website must have a browser that supports the font you use on the site. If this is not the case, it will use so-called fallback fonts. In your style.css file, the first font is the rule, which is being tried first. All the fonts that are behind are the fallback fonts that are used when the first font is unavailable. To change the font, change the font name after “Font-family:.” After customizing the style.css file, click ‘Update’ to apply the changes to your website. Make sure you always leave some fallback fonts!
How To Choose Right Typography For WordPress Website?

There is only so much you can learn about changing the font size of your site. What matters here is whether the font size you choose looks best and will not diminish the overall look of your site. If you do not employ the proper ways of choosing typography for your website, then don’t wonder why there are no visitors to your site in the first place.
Typography dominates web design, and there’s a good reason for it. Even websites that do not have much design are visited by many users because of how well-arranged and well-thought-out the font designs are.
Smart web designers know this very well, which is why they dedicate a good amount of time to planning the typography on every website they work on. They consider some factors when they plan the site’s architecture.
It may seem simple at first, but there are many considerations to consider, which is why it isn’t easy to nail typography on the first try when doing it on a website. Here are some pointers to follow when you are tasked to choose the right
Headings
One of the most important elements in your site is the titles because research shows that most people only read the headlines of the posts they read on the internet. The headline sparks the user’s interest and decides whether they are going to read the content or not. They don’t even bother when they are not interested. Only a small percentage bother to dig deep enough into the article, particularly among those who are very curious.
Headings are given a lot of importance even in SEO strategies. You have to create a heading that will stand out if you want to grab the reader’s attention and persuade them to look at the page’s content.
Based on the study reported in the Smashing Magazine from 2013, both serif and sans-serif fonts got almost a tie regarding headings. Around 51 percent use the sans-serif, while 47 percent use serif. The serif fonts have become popular in recent years mainly because they are far more readable compared to any other fonts so far, and they stand out.
When it comes to popularity, Chaparral Pro and Georgia are two of the most popular serif fonts. As for the sans-serif fonts, Freight Sans Pro and Arial are the most popular ones.
There is more to study about web typography, and it is not the same as how magazines are planned out. When you are assigned to design the typography of a website, careful planning should be done.
You have got to remember these rules for site typography especially if you want people actually to read the content that you post on your website. The font you use can quickly determine how user-friendly your WordPress site is.
Knowing how to change the font size and style of your WordPress website is essential. Whenever you create content for your WordPress website, it is a good idea to ensure that its font size and style are optimized for the web. This article can guide you through the process of doing that using WordPress.
This website is awesome and here work is too good so I want to here to ask a question about Microsoft word my question is what is the default font style of the Microsoft word if anyone knows about this please tell me