How to Create Stylish Call to Action Buttons in WordPress

Call to actions are the end-all and be-all of landing pages — a solid call to action is the first step into converting a cold visitor into a hot prospect.
It would be great to have a built-in functionality in WordPress that allows you to create call to action buttons with a simple shortcode generator … but unfortunately, there isn’t. Till then, we have to make do with an external plugin.
There are a number of call to action button plugins available for WordPress, but my personal choice is WordPress Call to Actions. Despite the resoundingly obvious name, the plugin has a unique set of features that set it apart from most others.
For example, the plugin allows you to A/B test two different versions of the same button. You can see at a glance which button performs better in terms of CTR (click through rate). It’s also compatible with WordPress Leads, a unique plugin from the same developers with the ability to track the leads you gain from your website.
Creating Call to Action Buttons
Not only is plugin powerful, but the button creation process is exceedingly simple and intuitive. At the same time, you get a whole lot of customization ability; you can personalize pretty much every aspect of each button to your exact liking.
Step 1: Choose your call to action button template.
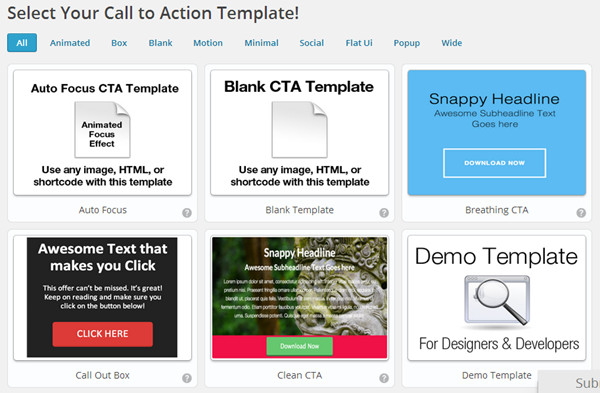
WordPress Calls to Actions comes with an impressive array of 14 different predefined call to action button templates that range from autofocus to feedburner subscriptions to facebook like buttons. You can even filter through the templates according to their function, animation, and display type.
For the purposes of this tutorial, I’m gonna go with a blank template. Click on it to get to step 2.
Step 2: Name your call to action.
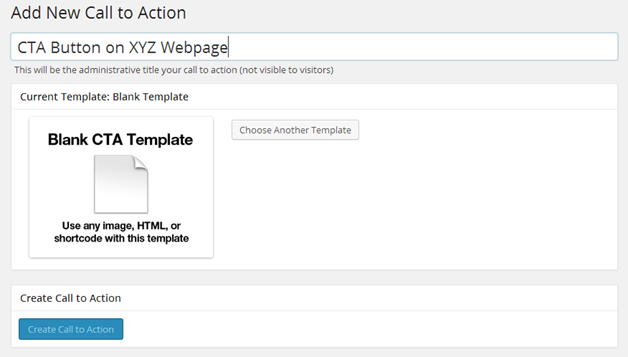
Just key in a name for your call to action button (not visible to visitors; just for admin purposes). The page also offers a quick link back to step 1 in case you’ve changed your mind about the template. When finished, click “Create Call to Action”.
Step 3: Fill in basic information.
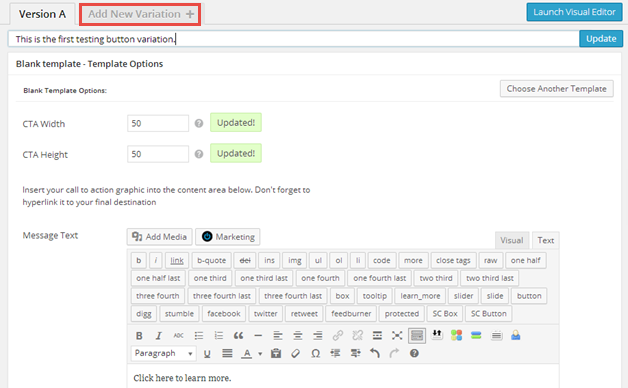
In this step, you’ll fill in the basic information for your button — type in the button text (hyperlink it to the correct URL) and the desired dimensions for the button. If you’d like, you can insert accompanying graphics and play around with the font color in the visual text editor. You can repeat the process by clicking on “Add New Variation +” and create a new “B” variation for A/B testing. After you finish filling in the details, publish the call to action.
After publishing, you can click on “Launch Visual Editor” to customize the button in real-time.
Step 4: Insert your call to action into a post/page.
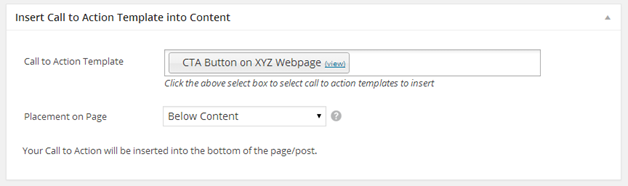
Once you’ve created the button, head over to edit the post/page that you want to insert a new call to action button into. Scroll down to the bottom of the screen to find a new meta box named “Insert Call to Action Template into Content”, select the appropriate button, and choose where you want to place the button on the page.
The placement options are: below content, middle of content, above content, a dynamic sidebar widget, or even a popup. Hit save, and tada! You’re all finished.
Wrapping Up
Using a call to action button instead of plain ol’ hyperlinked text is a great way to up the elegance on your blog and get more click throughs on your landing page.
With plugins like WordPress Call to Actions, the process is delightfully simple and straightforward. The only question now is: why aren’t you using it?
*Featured image courtesy Sean MacEntee via Flickr.
Great article. Really appreciate it. 🙂