Say No To Complex PCI Compliance Procedures- Time to Welcome Stripe in Wordpress

Whether or not you realize or consent to it, using Stripe for WordPress can affect your website. Owing to massive demand from customers, the plugin grabs a hold and doesn’t seem to let go. Call it something basic or bizarre; it surely has the potential to make things like accepting payments seamless for the site owner as well as its valuable audiences. Let’s find out how?
Time to get rid of confusing paperwork, expensive fine print, and complex PCI compliance procedures– all thanks to Stripe; one of the most straight-forward eCommerce payment gateways available today! From businesses to individuals, anyone can now create a type of payment system on their websites like subscriptions, to recurring billing to virtually any other monetary transaction.

In addition to this, you can easily collect your customer’s’ payment information neatly and securely on the web, irrespective of the devices (desktop, tablet or mobile). To cater to the international market, the plugin surely allows creating charges server-side in 100+ currencies. As it accepts Visa, MasterCard, American Express, Discover, JCB, and other credit and debit cards- Is there anything not to like? I guess not!
Stripe for Payments in WordPress

Why should you waste your time learning to incorporate Stripe in your existing site? I’ll give you three solid reasons.
#1 No fees and easy earnings
Being a high-performing plugin, Stripe has no secret installation fees, no monthly payments, and no hidden costs. The only money spent is the money your customer spends on your website. Isn’t that great! In addition to this, earnings are directly transferred to your bank account on a 7- day rolling basis. Unfortunately, this is something that is not offered by every payment method including Paypal as they don’t go straight into the bank account. The user has to sign into Paypal to get the money and often has to pay service charges.
#2 Saves time for returning customers
This good news is for your valuable customers; the popular WordPress plugin supports the subscription extensions and stores information for reusing cards. As soon as a customer pays, they are automatically and securely set up in Stripe as a customer. In case of creating another order, they can check out using the same card and the information will be fetched and ready to go. I must say this turns out to be a massive time-saver for regular customers.
#3 Easy to set up
Typically, integrating Stripe requires one to be a Wordpress developer if you’re using it Wordpress Website or hire one. But to use it you do not need to learn any programming. In fact, you can also use Stripe through any number of third-parties say for example that requires no programming, hosting, or complicated setup required on your behalf.
How to Set up Stripe for WordPress?
Not being an official WordPress plugin, Stripe focuses on ease and simplicity. Along with this Stripe, API is what has set them apart from competitors. It is imperative to note that SSL is required on your Stripe checkout pages to communicate payment data securely. Here you need to be very careful as you can harm your site if you don’t migrate properly.
Setting up Stripe on Basic WordPress Site
For those who don’t have any e-commerce solution set up or simply have one product to sell on a page. Stripe turns out to be one of the most beautiful ways to accept payment; this includes donations for an ebook or digital download without any additional overhead on your site. Down below I would like to come up with a step by step guide. Have a look!
Step 1
Download and install the WP Simple Pay Lite for Stripe plugin from the WordPress repository or by searching for it within your WordPress dashboard under “Add New” plugins.
Step 2
Click into the settings of the plugin and input your Stripe API keys, which you can grab from your Stripe account dashboard. Then click on “Save Changes.” You will notice there is an on and off switch. You can keep it turned off until you have everything configured.
Step 3
Now it’s time to click into the default settings tab. Here it’s time to give your site a name and set the currency. Don’t forget to provide an image. Apart from this, step ahead towards success with redirecting URL. In case, if you are planning to track conversations with a thank you page, then you will want to enable this. After this, scroll down and click on “Save Changes.”
Step 4
Now it’s time to insert a payment button on any page or post on your WordPress site with a simple shortcode. All you have to do is remember you can change the wording on the payment button right from the plugin settings. Adding Stripe to your WordPress site couldn’t be easier. Make sure to switch Live Mode over to “On” if you haven’t already in the settings. You can also take advantage of their free companion plugin which adds a button in your WordPress editor to more easily add payment buttons. No need to grab any shortcodes.
How to Setup Stripe in WooCommerce?
With over 3+ million active installs, a 4.6 user rating on WordPress.org, WooCommerce is considered as one of the most popular free e-commerce solution best for WordPress. By incorporating Stripe to Woocommerce, it significantly lowers the barrier of entry for anyone wanting to launch a WooCommerce shop and accept credit cards with Stripe.
Step 1
First and foremost, you have to do is install the free WooCommerce Stripe Payment Gateway plugin. It currently has over 300,000 active installs with a 4.7 out of 5-star rating. Now it’s time to download the plugin from the WordPress repository or by searching for it within your WordPress dashboard under “Add New” plugins.
Step 2
Simply click into the Woocommerce settings in the dashboard and click on the ‘’checkout tab”. This enables stripe and inputs your Stripe API keys, which you can grab from your Stripe account dashboard. Choose whether you wish to enable “Stripe Checkout.” Stripe checkout shows a pay button and modal credit card form on checkout instead of the classic credit card fields. Then scroll down and click on “Save Changes.”
Step 3
Now under the checkout tab click into ‘checkout options.’ You have to enable “Force secure checkout.” Remember that Stripe requires SSL to accept credit cards securely on your WordPress site. Then scroll down and click on “Save Changes.”
And that’s it. Your checkout pages should now be able to accept credit cards with Stripe.
Other Things That Matter Include
1.Customize Result Page
After your customers are done with their purchasing, they will ultimately reach to “checkout and the checkout result” page. Showing a simple Thank You or Do visit again message allows customers to move on or comeback with their purchase. If you want you can add more messages to this page by editing this page from your WordPress admin dashboard. Add your message above or below the existing shortcode of that page (keep the shortcode as is).
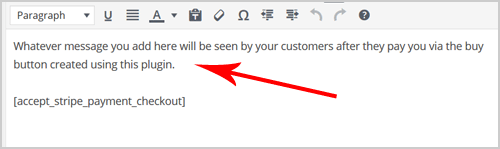
In addition to this, you can collect shipping and billing address during the transaction. For this, you need to specify the following two parameters in the stripe payments shortcodes to collect the address data.
- billing_address=”1?
- shipping_address=”1?
[accept_stripe_payment name=”Cool Script” price=”50″ button_text=”Buy Now” billing_address=”1″ shipping_address=”1″]
This will show
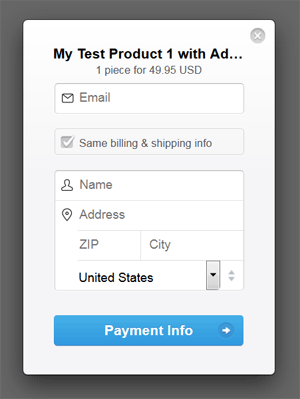
Image source: tipsandtricks-hq.com
As soon as these parameters are enabled, Stripe order details in the admin dashboard will show the customer’s billing and shipping address for the transaction.
2.Adding a Logo to the Stripe Payment Window
It may quite interest you to know that you can show an item logo in the Stripe payment window. Specify the logo image URL using the “item_logo” parameter in the shortcode.
[accept_stripe_payment name=”Cool Product” price=”25.00″ button_text=”Pay Now” item_logo=”http://your-domain.com/product-logo.png”]
3.Adding customer description
Have you ever thought of adding a custom description for the item/product/service that will get shown in the stripe checkout/payment window of the item? Specify the description using the “description” parameter in the shortcode.
4.Specifying a Language
With Stripe, you can show the checkout popup in a few different languages. You can set the language by going to the settings menu of this plugin and selecting an option from the “Stripe Checkout Language” drop-down field.
Best Stripe Wordpress Plugins to Consider
- WP Simple Pay Pro– It handles set up fees and subscriptions. Also, it allows you to create customizable forms with a drag and drop payment forms builder and adding custom fields to collect data on each account
- WooCommerce Stripe Payment Gateway– With the help of this plugin, faster checkout is now possible. Smooth integration between your WooCommerce store and Stripe account. This includes a number of filters and hooks that you can use to show login status, review orders and more.
- Stripe Payments– The plugins allows one to sell digital goods, collect tax and donations. Save card data on Stripe account, use Remember Me feature to allow one-click payment via Stripe.
Leave a Reply