How to add Facebook retargeting to your WordPress Site?
Facebook, a social media platform which is know almost everyone in the world. With a monthly active user base of 1.71 billion, it is the biggest platform too. This makes it one of the most desired platforms for advertising.
Online marketers are thriving to get their ads on Facebook to reach to the huge audience it has. But sometimes, Facebook ads are not enough as they target random audience who might not be interested in our product. There comes Facebook Retargeting.
A term and a methodology used by Facebook to retarget people who have already shown some sort of interest in your product by visiting your product page. This maximizes the chances of people buying the product as they have already shown interest in the product.
Today, we are going to learn how you can use Facebook retargeting on your WordPress site and what are the steps involved in implementing it.
What is Facebook retargeting and why to use it
In marketing terms, retargeting is also referred to as remarketing. It means to target the audience who have already shown interest in your product, have visited you website. Amazon does it a lot. Whenever you search for a product on Amazon and then you go to some website which allows ads, you might see the same products that you checked on Amazon. That’s retargeting.
Facebook retargeting works same way. It shows ads of your product or service on Facebook to the users who have visited your site. In order to do that, you’ve to insert a Facebook Pixel code, which we learn shortly.
Why use Facebook retargeting for WordPress
Let’s understand the benefits of doing Facebook retargeting for WordPress site.
- It gives you another chance to attracting a lead and converting him to a customer
- It helps in increasing website traffic
- It helps you understand what visitors are interested in, so you can create ads accordingly and get more conversions
- It is helpful for both small and large businesses
In order to extract all the benefits, you need to know about the Facebook remarketing pixel.
What is Facebook remarketing pixel
Facebook remarketing pixel is a script that you need to add to your WordPress site. It is basically a tracking code which is used by Facebook to track certain activity on your website.
The pixel does not add any visible changes to your site. It just sends a browser cookie to your website visitors.
The browser cookie allows Facebook to retarget Facebook users who have visited your website.
Let’s now learn how to create a Facebook Pixel and add it to your WordPress site.
How to create a Facebook Retargeting Pixel
In order to create a Facebook retargeting Pixel you will have to first login to your Facebook account and then visit Ads Manager. Once you have logged in you’ll see get a screen where Facebook will ask you to create an ads. Close it without saving from a button at bottom left corner. Next click on Adverts Manager, you will see a menu. In the menu under Assets you’ll see Pixels.
![]()
Click on Pixels, and create a Facebook pixel.
![]()
When you click on ‘Create a Pixel’ button, it will show you a popup where you have to enter a name of your pixel. The name can be your business name, product name or any easily understandable name. Remember, you can only create one Facebook Pixel per account.
![]()
Next, you’ll see a success message with the unique Pixel ID.
In the message, you’ll see two options – Install Pixel Now and Email Pixel Code.
If you manage your website yourself, select ‘Install Pixel Now’. If someone else manages the technical things of your website click on ‘Email Pixel Code’.
![]()
If you click on ‘Install Pixel Now’, Facebook will show you the Pixel code which you can install on your WordPress site. Next you just need to copy the code and install on your site. If you choose to ‘Email Pixel Code’ to your WordPress developer, ask him to follow the following steps.
![]()
How to install Facebook Pixel on your WordPress site
Now that you have successfully created a Facebook Pixel, it is time to install it on your WordPress site.
Before adding the Pixel code, I would recommend you to install the Insert Headers and Footers plugin. After installing the plugin, go to Settings > Insert Headers and Footers, and paste the Pixel code in the Scripts in Header section. Save the changes you made.
![]()
There is also another way of adding the Pixel code.
In this method, you just have to insert the Pixel code right before the closing </head> tag of your theme file. You can do this by editing the header.php file. You can access this file by going to Appearance > Editor.
Now, you have successfully installed your Facebook Pixel on your WordPress site. However, the easier part is done. Now you’ve to actually use the Pixel you created for retargeting. Let us learn how it is done.
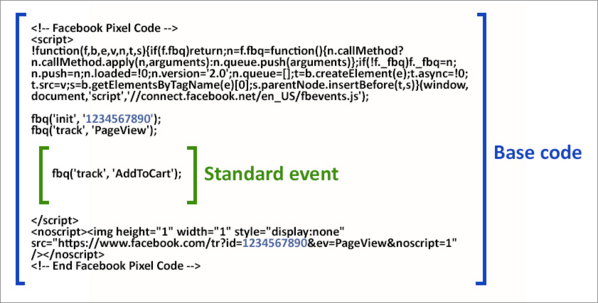
How to add standard events for Facebook pixel
First of all, you should know what an event is. An event is an activity that happen on your website such as registration of user, purchase of a product, product added to cart, etc.
Facebook has defined 9 standard events of there own. All of which have specific codes which you need to add with Pixel code. With proper use of these standard events you can track your website performance in a better way.
For example, you would like to track how many people add products to the cart. For this, you may simply use the ‘Add to cart’ event and the code corresponding to it. All you have to do it simply, add the standard event code before </script> tag of the Pixel.
This will allow you to track the specific event that happen on your site.
Facebook also allows you to add custom events of your choice other than the 9 standard events. To use custom events you’ll have to go through the documentation provided by Facebook.
How to create custom audience for Facebook Pixel
Facebook has 1.71 billion monthly active users and targeting all them is not a good strategy. You need to target a specific section of users called, custom audience. Custom Audience is an important feature Facebook Pixel offers. It allows you to target audience for your retargeting campaign.
Additional Reading: Using Facebook’s social graph to understand audience
To create custom audience, you need to click the Custom Audience under your Pixel. When you click on the button, you’ll see this screen.
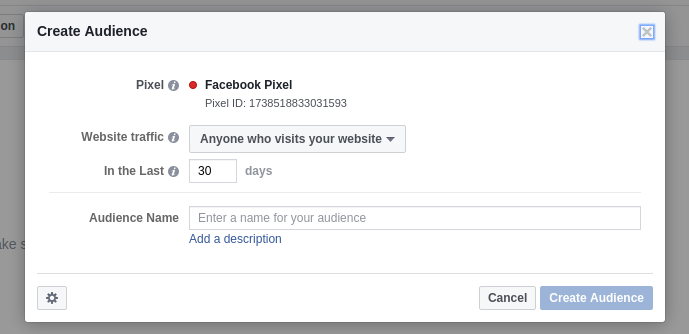
In the popup, you’ll will see your Pixel ID and option to select the website traffic. Here you’ll see 5 options. People who visit your website, people who visit specific web pages, people who visit specific web pages but not others, people who haven’t visited your site for a certain period and last custom combination.
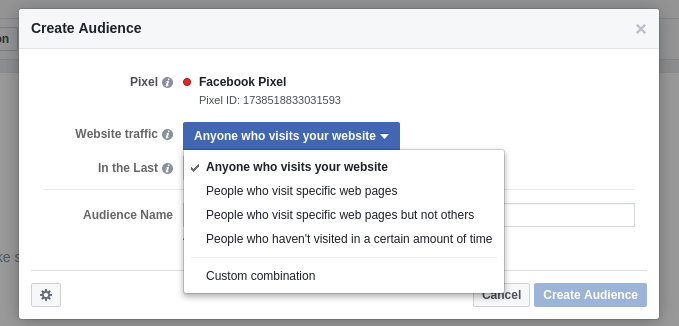
You can select any of the options and create custom audience. For this tutorial’s sake, I’ll select ‘Anyone who visits your website‘. Now select the number of days which you want to track. Next, give a name to your audience and your custom audience is created.
You can create as many custom audiences as you want. Target different people to know which one works for you. It is going to trial and error only.
How to show ads to custom audience using Facebook pixel
The final and the most important step is to reach out to people by showing them your ads. For this, you have to create an advert in Facebook.
Click on the green ‘Create Advert‘ button to create a Facebook ad. Once you click on it, you’ll see the following screen.
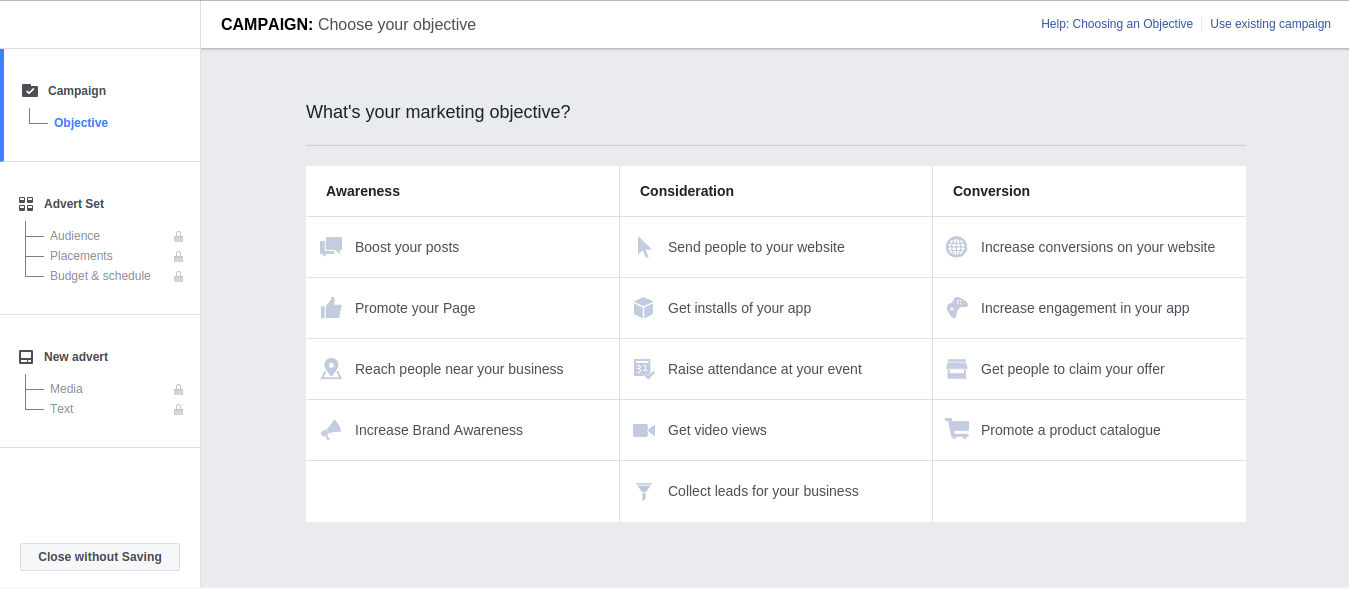
Select your marketing objective from the options, such as sending traffic to your WordPress website. For this select ‘Send people to your website‘.
Related:
Choose the correct objective which matches with your marketing goal.
Once you select your objective, you’ll be asked to name your campaign. Give a name which you can recognize easily in future.
If you don’t have an advert account you’ll be asked to create one. Once done, you have to select the audience you want the ad to target to. Here, select the custom audience you created earlier.
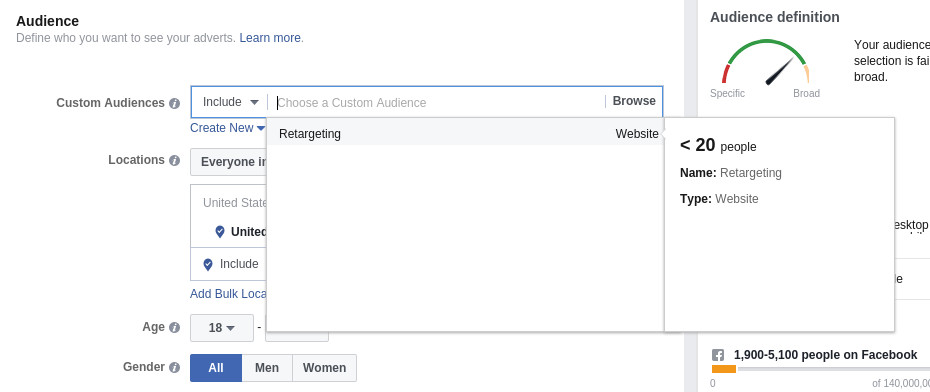
Follow the steps to create your Facebook ads. You have to select the locations, budget, ad placement and few other things to publish your ad.
That’s it. You have now successfully created a Facebook Pixel, created a Custom Audience and assigned to the Pixel and finally published your Facebook Ad.
Wrapping up
Facebook Retargeting Pixel is a great to remarket your website, product or service. It is much more effective than normal adverts as you’re showing it to people who have already shown some sort of interest in your services.
I hope you liked this article on how to add Facebook retargeting for WordPress site. If you have any questions or queries about the topic, please leave a comment below and I will be happy to help.
Leave a Reply